

You’ve published a beautiful article. The images are stunning — sharp, well-lit, professional. But when someone searches for exactly what you’re showing, your images are nowhere in Google’s results. Meanwhile, a competitor’s blurry screenshot is sitting right at the top.
That’s the reality of image SEO. Uploading an image is easy. Getting it ranked is a different story.
Google processes billions of images, but it can’t see them the way humans do. It reads your file names, alt text, format, and page speed to decide if your image should show up in search.
This guide walks you through every step of optimizing images for Google search, from choosing the right format before you upload to adding schema markup after you publish. If you follow these steps, your images won’t just look good — they’ll actually work for you.
Why Image SEO Still Matters in 2026
Some SEOs treat image optimization as an afterthought — something you do if you have extra time. That’s a mistake, and a costly one.
Google Images is one of the largest search engines on the planet, sitting right inside the world’s most-used search engine. Every day, millions of people search specifically for images — product photos, how-to illustrations, before-and-after comparisons, and infographics. If your images aren’t optimized, you’re invisible to all of them.
But it’s not just about Google Images anymore. In 2026, optimized images can appear across multiple Google surfaces:
- Google Image Search — the classic image results tab
- Google Discover — the personalized feed on Android and Chrome (Google recommends images be at least 1,200 pixels wide to qualify)
- Google Lens — a visual search that identifies objects from photos
- AI Overviews — Google’s AI-generated summaries now pull images to support answers
- Featured Snippets — images can appear alongside text snippets in position zero
On top of that, properly optimized images are smaller and faster to load — which directly improves your Core Web Vitals, a confirmed Google ranking factor. The largest image above the fold often determines your Largest Contentful Paint (LCP) score. A slow LCP hurts your ranking across all search results, not just image search.
In short: image SEO helps your rankings, your traffic, and your user experience — all at once.
How Google Finds and Ranks Your Images
Before optimizing, it helps to understand how Google actually discovers and evaluates images.
Discovery: How Google Finds Your Images
Google’s crawler (Googlebot) reads your page’s HTML. It finds images through the src attribute of <img> elements. This is a critical point: Google does not index CSS background images. If your image is set via CSS (background-image property), Google cannot find it or rank it. Always use proper HTML <img> tags.
You can also help Google discover images it might otherwise miss by submitting an image sitemap — an XML sitemap that includes image URLs and metadata. This is especially useful for large sites with thousands of images.
Ranking: What Google Uses to Evaluate Images
Once Google finds an image, it evaluates several signals to determine relevance and quality:
- File name — does it describe the image content?
- Alt text — what does the alt attribute say?
- Surrounding text — what’s the heading, paragraph, and page topic?
- Page quality — is the page authoritative, well-structured, and ad-light?
- Image quality — is it sharp, high-resolution, and clear?
- Page speed — how fast does the page load?
- Structured data — is there schema markup describing the image?
- Entities — do the image signals connect to recognized entities that Google understands?
Understanding these signals is the foundation. Now let’s optimize for each one.
Step 1 — Choose the Right Image Format

Your image format affects both visual quality and file size — two things Google cares about deeply. Choosing the wrong format can make your images unnecessarily heavy without any quality benefit.
Google’s supported image formats for indexing are: JPEG, PNG, WebP, SVG, GIF, and BMP. Here’s when to use each:
| Format | Best Use Case | Key Advantage |
| WebP | Photos, illustrations, most web images | 25–80% smaller than JPEG at equal quality — Google’s recommended format |
| JPEG | Photos when WebP isn’t supported | Universal compatibility, good compression |
| PNG | Logos, graphics with transparency, screenshots | Lossless quality, supports transparent backgrounds |
| SVG | Icons, logos, simple illustrations | Infinitely scalable without quality loss, tiny file size |
| GIF | Simple animations only | Limited to 256 colors — avoid for photos |
Step 2 — Use Descriptive, Keyword-Rich File Names

Most people upload images straight from their camera or phone with names like IMG_4821.jpg or photo-3.png. Google crawls those file names. A meaningless name is a missed opportunity.
Search engines use file names as one of the signals to understand what an image is about. A descriptive, keyword-relevant file name helps Google connect your image to the right search queries.
The File Naming Formula
Use this structure: [keyword]-[descriptor]-[context].extension
Separate words with hyphens, not underscores or spaces. Aim for 5–7 words — specific enough to be meaningful, concise enough to be clean.
| ❌ Bad File Name | ✔ Good File Name |
| IMG_4821.jpg | kitchen-renovation-before-after-2026.jpg |
| photo1.png | chocolate-layer-cake-recipe-slice.jpg |
| image-3.webp | how-to-tie-bowline-knot-step3.webp |
| DSC00192.jpg | office-desk-ergonomic-setup-home.webp |
Notice the pattern: every good file name describes exactly what the image shows, includes a relevant keyword naturally, and uses hyphens. None of them is stuffed with keywords — just clear and descriptive.
Step 3 — Write Effective Alt Text

Alt text is the single most important image SEO signal you control on the page.
It was originally designed for accessibility — screen readers use alt text to describe images to visually impaired users. But alt text also tells Google exactly what your image contains. And with AI models increasingly reading alt text as context signals, its importance has only grown.
How to Write Good Alt Text
Describe what’s in the image clearly. Write it as if you’re describing the image to someone who can’t see it. Include a keyword if it fits naturally — but never force it.
| ❌ Bad Alt Text | ✔ Good Alt Text |
| image | Golden retriever puppy playing in a grassy backyard |
| kitchen | Modern white kitchen with marble countertops and stainless steel appliances |
| SEO tips, SEO keywords, SEO strategy | Infographic showing the 5 key steps of an SEO strategy |
| ” ” (empty on important image) | Bar chart showing monthly organic traffic growth from January to March 2026 |
| Click here | Woman working on a laptop at a standing desk in a home office |
One important rule: decorative images should have empty alt text (alt=””). If an image is purely a visual decoration and adds no informational value, an empty alt attribute tells screen readers and Google to skip it. Don’t write filler alt text just to fill the field.
Step 4 — Compress Images Without Losing Quality

Imagine clicking a link on your phone and waiting six seconds for an image to load. Most people don’t wait — they leave. Google knows this and uses page speed as a ranking signal.
Images are typically the largest contributors to page weight. Unoptimized images make up nearly 38% of the average mobile webpage’s total size. Compressing your images reduces that weight and speeds up your page — improving both user experience and your Core Web Vitals score (specifically, LCP).
Recommended Compression Tools
| Tool | Best For |
| Squoosh (squoosh.app) | Manual compression with before/after preview — free, browser-based |
| ShortPixel | WordPress plugin — auto-compresses on upload, supports WebP conversion |
| TinyPNG / TinyJPG | Quick drag-and-drop compression for PNG and JPEG files |
| Cloudflare Polish | Server-level image optimization for sites behind Cloudflare |
| Google PageSpeed Insights | Identifies which images are slowing your page and by how much |
| ImageOptim (Mac) | Lossless compression for Mac users — great for PNGs |
The goal is to find the smallest file size that still looks sharp at the display size you need. You don’t need a 3,000-pixel-wide image if it’s displayed at 800px wide — resize it first, then compress.
Step 5 — Make Images Responsive

Most of your visitors are on mobile. Google uses mobile-first indexing, which means it evaluates your mobile site — not your desktop site — when deciding rankings. If your images aren’t built for mobile, you have a problem.
Responsive images solve this by serving different image sizes to different devices. A desktop user gets a large image. A mobile user gets a smaller, faster version. The content is identical — only the file size differs.
The srcset Attribute
The simplest way to implement responsive images is with the srcset attribute on your <img> tag:
| <img src=”hero-800.webp” srcset=”hero-400.webp 400w, hero-800.webp 800w, hero-1200.webp 1200w” sizes=”(max-width: 600px) 400px, (max-width: 1000px) 800px, 1200px” alt=”Modern home office setup with ergonomic desk”> |
This tells the browser: load the 400px version on small screens, 800px on medium screens, and 1200px on large screens. The user gets a fast, sharp image on every device.
Always Define Width and Height
Add explicit width and height attributes to every image. This tells the browser how much space to reserve before the image loads, preventing Cumulative Layout Shift (CLS) — a Core Web Vitals metric that directly impacts your ranking. It’s a two-second fix with real SEO consequences.
Step 6 — Use Captions and Surrounding Context
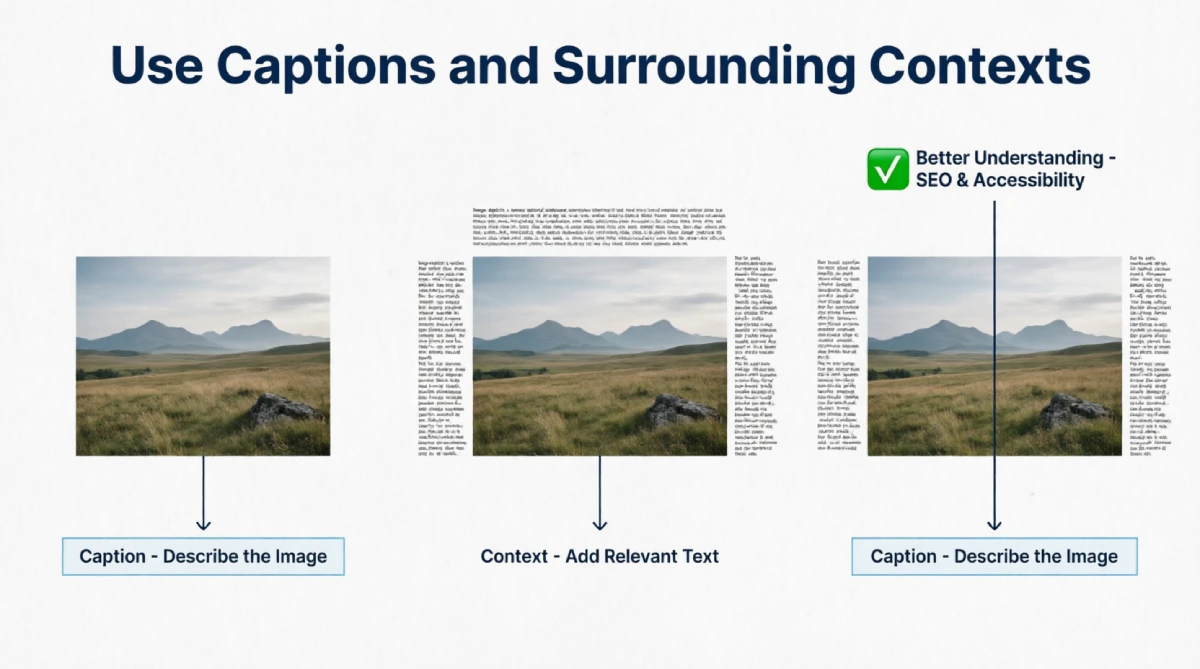
Here’s something most image SEO guides skip: Google considers the text around your image when deciding what it’s about.
According to Google’s own documentation, the surrounding page content — including headings, body paragraphs, and captions — influences how and where an image appears in search results. A photo of a kitchen renovation will rank better for renovation queries when it’s surrounded by renovation content than when it’s placed randomly in an unrelated article.
Image captions also matter. Captions are typically the most-read text on a page after headlines. They’re also visible to Google as descriptive context. A good caption reinforces what the image shows and provides additional keyword context — naturally, without stuffing.
Placement tip: Place images close to the text they’re related to. Don’t dump all your images at the top or bottom of an article. Spread them logically, near the relevant section.
Step 7 — Enable Lazy Loading

Lazy loading means images only load when they’re about to enter the user’s viewport — as they scroll down the page. Images below the fold aren’t loaded upfront, which makes the initial page load significantly faster.
Adding lazy loading is simple. In modern HTML, you just add the loading attribute:
| <img src=”team-photo.webp” alt=”Our editorial team at BlogsORA” loading=”lazy” width=”800″ height=”500″> |
Important: Do not lazy-load the hero image or the largest image above the fold. That image is your LCP element. Loading it lazily would actually delay it and hurt your Core Web Vitals score. Lazy loading is for everything below the fold.
Step 8 — Add Images to Your XML Sitemap

By default, Google discovers images by crawling your pages. But it doesn’t always find every image — especially on large sites, JavaScript-heavy pages, or pages that aren’t frequently crawled.
Submitting an image sitemap gives Google a direct map to all your images. You can include image URLs inside your regular XML sitemap using image-specific tags, or create a dedicated image sitemap.
If you’re using WordPress with Yoast SEO or RankMath, image sitemaps are automatically generated. Just make sure the setting is enabled in your plugin’s sitemap configuration, then submit or re-submit your sitemap via Google Search Console.
Step 9 — Add Structured Data (Schema Markup)

Structured data is code you add to your page that helps Google understand your content more clearly. For images, the relevant schema types are:
- ImageObject — describes an individual image with properties like name, description, creator, license, and URL
- Article + image property — connects your article’s featured image to the article entity
- Product schema — for e-commerce product images, can trigger product badges in image search
Implementing ImageObject structured data makes your images eligible for rich results in Google Image Search — including creator attribution, license information, and featured image panels. Google’s Structured Data Markup Helper and Schema.org are the go-to resources for building and validating this markup.
Think Beyond Rankings: Visual Search in 2026
The traditional goal of image SEO was to rank in Google Image Search. In 2026, that’s only part of the picture.
Google’s visual ecosystem has expanded dramatically. Your optimized images can now appear in:
- Google Lens — users photograph objects with their phones, and Google identifies them. Optimized, entity-rich images with strong surrounding context are more likely to surface as Lens results.
- Google Discover — the social-feed-style surface on mobile Chrome and Android. To qualify for large image previews in Discover, your images must be at least 1,200 pixels wide, and your page must allow large image previews via max-image-preview:large in the robots meta tag.
- AI Overviews — Google’s AI-generated answer boxes increasingly include images to illustrate explanations. These images are pulled from high-quality, well-optimized pages. Strong alt text, file naming, and structured data all feed these AI signals.
Bottom line: in 2026, your images can show up in Image Search, Discover, Lens, and AI Overviews — not just one tab.
Common Image SEO Mistakes to Avoid
| ❌ Mistake | ✔ What to Do Instead |
| Using CSS background images for important content | Use <img> tags so Google can crawl and index them |
| Leaving default camera file names (IMG_4821.jpg) | Rename to descriptive, hyphenated, keyword-relevant names |
| Writing keyword-stuffed alt text | Write naturally descriptive alt text — one main keyword maximum |
| Uploading 4MB photos to a blog post | Compress to under 200KB (WebP) without visible quality loss |
| Skipping width and height attributes | Always define dimensions to prevent CLS and improve LCP |
| Using JPEG for everything | Use WebP as default; JPEG as fallback; PNG only for transparency |
| Using the same stock photo as 20 other websites | Use original images — they carry unique entity value |
| No lazy loading on a page with 15+ images | Add loading=’lazy’ to all below-the-fold images |
| Never checking image performance in Search Console | Monitor Google Search Console > Search results > Image search filter regularly |
Image SEO Pre-Publish Checklist
- Format: Converted to WebP (or PNG for transparent graphics, SVG for icons)
- File name: Descriptive, keyword-relevant, hyphens only — no spaces or underscores
- Alt text: Written, descriptive, natural — not empty (unless decorative)
- Compression: File size checked — photos under 200KB, icons under 20KB
- Dimensions: Resized to the actual display size — not 3x larger than needed
- Width & height attributes: Defined in HTML for every image
- Lazy loading: loading=’lazy’ added to all below-the-fold images
- Caption: Added where relevant — describes the image and reinforces context
- Sitemap: Image appears in XML sitemap (auto-generated by Yoast/RankMath)
- PageSpeed check: Run Google PageSpeed Insights — no image-related warnings
FAQs
Does the image file name actually affect Google rankings?
Yes — file names are one of the signals Google uses to understand what an image is about. A descriptive file name like ‘chocolate-lava-cake-recipe.webp’ tells Google far more than ‘IMG_0093.jpg’. It won’t make or break a ranking on its own, but combined with strong alt text and good surrounding content, it adds meaningful context.
What’s the best image format for SEO in 2026?
WebP is the recommended format for almost all web images. It produces files 25–80% smaller than JPEG at the same visual quality, it’s supported by all major browsers, and Google itself developed the format. Use PNG only when you need lossless quality or transparency; use SVG for icons and logos.
How important is alt text for image SEO?
Alt text is the most important on-page signal for image SEO. It directly tells Google what an image contains, supports accessibility for screen readers, and provides keyword context. Google has explicitly stated it uses alt text to index images — always fill it in for content images.
Do I need to submit an image sitemap?
Not always, but it helps significantly on large sites or pages that aren’t crawled frequently. An image sitemap ensures Google can discover all your images, even those embedded in JavaScript or on low-traffic pages. WordPress plugins like Yoast and RankMath handle this automatically.
What size should images be for Google Discover?
Google recommends images be at least 1,200 pixels wide to qualify for large thumbnail previews in Discover. You also need to allow large previews in your robots meta tag using: <meta name=’robots’ content=’max-image-preview:large’>. Both conditions must be met.
Can Google index images loaded by JavaScript?
Google can sometimes render JavaScript and discover dynamically loaded images, but this is unreliable and slow. For SEO-critical images, always use standard HTML <img> tags with a src attribute. Don’t rely on JavaScript rendering for images you want indexed.
Conclusion
Image SEO doesn’t have to be complicated. It comes down to one thing: help Google understand what your image shows.
The steps in this guide cover every signal that matters — from the file name you choose before you upload, to the schema markup you add after you publish. You don’t need to do all these necessary steps on day one. Start with the basics — alt text, file naming, and WebP compression — and work your way through the rest.
In 2026, images don’t just live on your page. They appear in Google Image Search, Discover, AI Overviews, and Lens results.
Make your images work as hard as your words do.