

That peeling paint at the bottom of your wall isn’t bad luck. The white crusty powder isn’t surface mould. When you press the plaster, and it yields like a stale cracker, you’re not dealing with condensation—your wall is drinking groundwater.
I learned this the hard way on a 1930s semi. Three months after a fresh paint job, bubbles appeared in a neat line 18 inches above the skirting. The plaster behind the bubbles was so soft I could scrape it away with my thumbnail — a major warning sign that the wall can no longer reliably hold fixings, anchors, or mounted shelves. That’s when I discovered rising damp, and exactly how a DIY chemical DPC injection stops it cold.
This guide walks you through the 2026 reality: updated material costs, faster-curing DPC creams, and the non-negotiable external works most tutorials skip. No contractor required.
First, Make Sure It’s Really Rising Damp
True rising damp is much rarer than DIY blogs suggest. Condensation at cold wall bases, penetrating leaks, or hygroscopic salts from old chimney breasts can mimic every symptom. Misdiagnose the cause, and you’ll inject a barrier that does nothing while the real problem festers.
Trust these signs—not just one, but several together:
- Paint bubbling or peeling within the first metre of the floor, stopping abruptly at a distinct horizontal “tide mark.”
- White, fluffy salt deposits (efflorescence) that reappear after brushing off.
- Plaster that crumbles or sounds hollow when tapped.
- A musty, earthy smell that worsens after rain.
- Dark, cool, damp patches at waist height or below that don’t dry out in summer.
If you only see mould in the corners of an outside wall, you’re almost certainly dealing with condensation, not rising damp — especially in rooms with poor airflow, trapped humidity, or cooling problems that prevent proper moisture control.
A cheap pin-type moisture meter will give misleadingly high readings on salty plaster, so don’t rely on a single spot check. Take readings over several days at fixed points and look for a persistent gradient—highest at the floor, dropping as you move up. If the pattern stays consistent, rising damp is the prime suspect.
Why Your Plaster Is Actually Crumbling
The wall acts like a bundle of drinking straws. Brick and mortar are shot through with microscopic capillaries. When the base of the wall sits in wet ground, water climbs through those capillaries by capillary action, often reaching 0.5 to 1.0 metres before gravity wins the battle.
As the water evaporates from the plaster surface, it leaves salts behind. These salts are hygroscopic: they pull moisture from the air, keeping the wall damp even on dry days. The plaster can’t breathe. It expands, cracks, and eventually falls away from the masonry.
What a DPC Does (and Why Yours Failed)
A damp proof course is a waterproof layer built into your wall, typically 150 mm above outside ground level. Pre-1919 homes may have had a physical DPC of slate, lead, or bitumen that has broken down or been bridged by later paving. Homes without any DPC behave like a sponge from the footings up.
Chemical DPC injection creates a new barrier inside the wall by saturating one mortar course with a water-repellent cream. The active silane/siloxane fluid spreads through the mortar’s pore structure and bonds to mineral surfaces, permanently altering the capillary pull.
In 2026, most retail creams cure to full hydrophobicity in 2–6 weeks, and many hybrid formulations offer a faster initial set, though the wall still needs time to dry out afterwards.
Before You Start: Tools, Materials, and Safety
Tools
- 12 mm masonry drill bit, long reach (200–400 mm). For engineering brick or hard stone, use an SDS-plus bit and a rotary hammer drill.
- Power drill with hammer function, or SDS drill for tougher walls.
- Heavy-duty skeleton gun or applicator gun (manual or battery-powered) that fits the cream cartridges.
- Trowel, bucket, mixing paddle.
- Moisture meter — entry-level digital pin-type meters now cost £15–25. If the wall is heavily salted, consider hiring a carbide meter for reference.
- PPE: P3 respirator mask (not a paper dust mask), safety goggles, heavy-duty gloves, and knee pads.
Materials
- DPC injection cream (silane/siloxane-based) — expect to pay £50–120 for a standard-room kit in 2026, depending on wall thickness and length.
- Mortar plugs (coloured to match your pointing) or a pre-mixed mortar repair compound for sealing injection holes.
- Breathable salt-inhibiting render: for most pre-1919 solid walls, use a natural hydraulic lime (NHL 3.5) and sharp sand mix with a salt-retardant additive. For modern cavity walls or cementitious backgrounds, a 3:1 sharp sand and cement mix with a salt-resistant admixture is appropriate.
- Finish plaster (lime-based topcoat for old buildings, multi-finish for newer ones).
- Waterproof render additive (generic salt-inhibitor, widely available from builder merchants).
Total DIY material cost for an average room now runs £110–200. Professional injection and replastering, for comparison, typically costs £800–2,500 depending on wall length, access, and the need to strip out contaminated plaster.
External Works That Must Come First
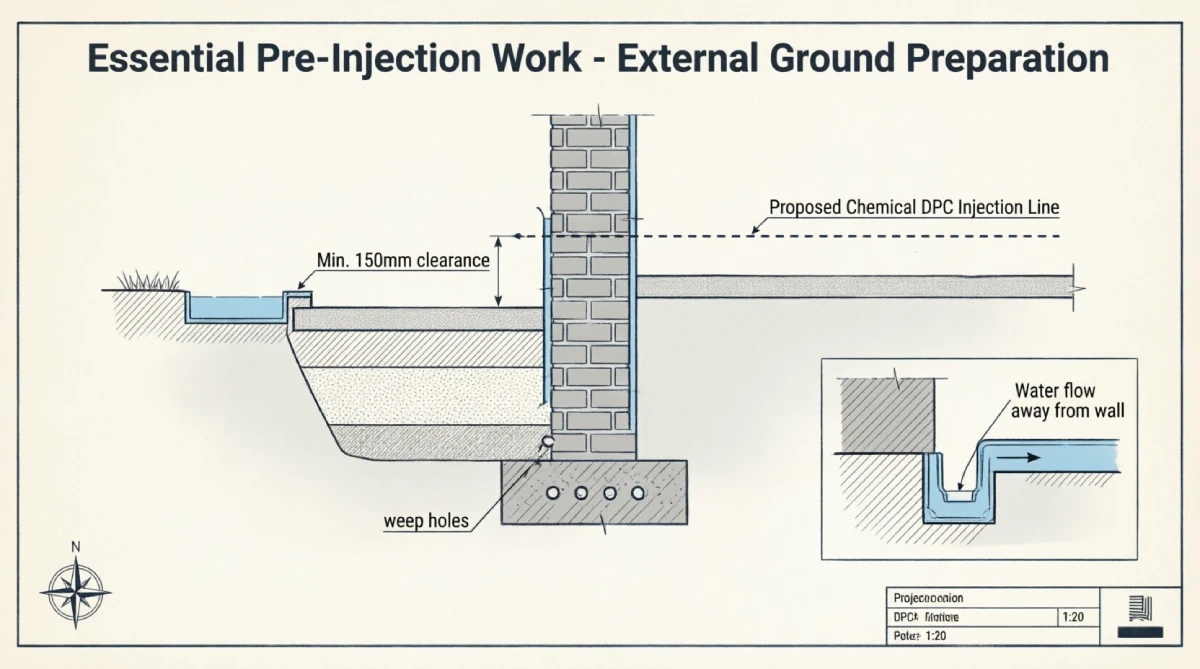
No injection will work if the outside ground levels bridge your new DPC. Before you pick up a drill, tackle these jobs:
- Lower external soil or paving to at least 150 mm below the intended DPC line. If you can’t lower it (e.g., a solid concrete path at the same level), install a linear drainage channel against the wall.
- Clear or replace blocked air bricks under suspended floors. Stagnant air under the floor feeds moisture into the wall from below.
- Repair leaking gutters and downpipes that discharge water next to the footings. Even contaminated or overflowing stored water systems can worsen long-term moisture exposure around masonry and foundations.
- Dig a French drain if groundwater runs towards the wall. Even a simple gravel-filled trench 300 mm wide and 600 mm deep, lined with geotextile, takes hydrostatic pressure off the foundation.
Skipping these steps is the single biggest reason DIY DPC injections fail within a year.
Step-by-Step: Inject Your Own DPC
1. Remove the Contaminated Plaster
Hack off all plaster from the floor to at least 1 metre high. If you see tide marks or salts above that, go 300 mm above the highest visible sign. Salts trapped in old plaster will pull moisture long after the injection cures, so be ruthless. Bag the waste immediately—the dust is irritant and salt-laden.
2. Record a Baseline Moisture Profile
Use your moisture meter at 150 mm (6-inch) intervals, starting at the floor and moving up. Write down the four or five readings on the bare masonry. These numbers are your proof of success later, but remember that a cheap meter gives wood moisture equivalent (WME), not absolute moisture content. The trend matters more than the absolute value.
3. Mark the Drilling Line
Choose one continuous mortar course at least 150 mm above the external ground level. Avoid the brick faces—mortar beds are where the barrier must sit. Run a pencil along the entire joint. Mark drill centres every 100–120 mm. For a solid 230 mm (9-inch) wall, drill horizontally to within 10–20 mm of the opposite face. On a 115 mm single-skin wall, drill about 100 mm deep.
4. Drill and Clean the Holes
Drill 12 mm diameter holes with a hammer, setting engaged. Stay precisely in the mortar. If you drift into brick, stop and re-centre. After drilling, blow out all dust with compressed air or vacuum—debris left in the hole blocks the cream’s spread.
5. Inject the Cream
Load the cartridge into the gun and fit the extended nozzle. Squeeze slowly into each hole until the cream appears at the entrance. Work methodically along the whole wall; every hole matters. Any gap in the line becomes a potential leak point.
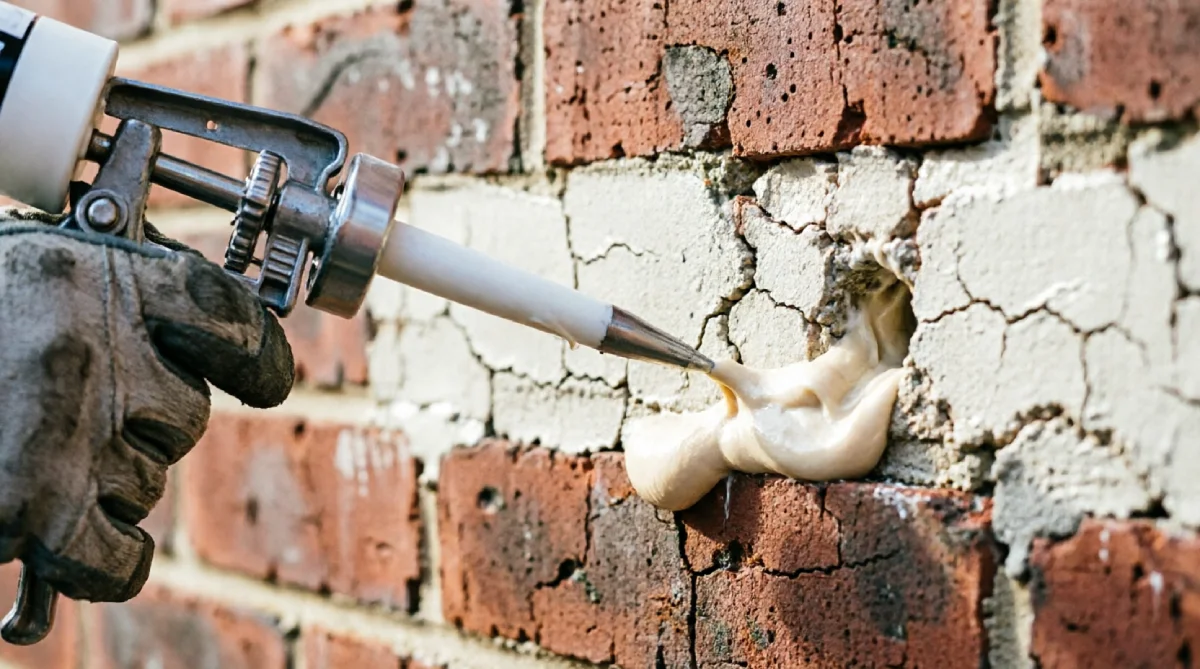
Once inside the mortar, the cream reacts with moisture and expands, filling the capillary pores. Modern 2026 formulations often set within a few hours, but the wall remains damp until the mass moisture evaporates. Allow 4–6 weeks of drying time after injection before you replaster.
6. Seal the Holes
Plug each injection hole with matching mortar or purpose-made plastic plugs. This stops rainwater from entering the cavity and gives a neat finish.
Replaster with Salt-Resistant Render
Standard gypsum plaster will bubble and fail within months of contact with residual salts. The replacement must trap any remaining salt behind the finish while letting the wall breathe.
For most solid walls built before 1919, mix a hydraulic lime render (NHL 3.5) with sharp sand at 1:2.5–3, incorporating a dedicated salt-inhibiting liquid. Apply two scratch coats, keeping the surface damp for 5–7 days to prevent shrinkage cracking. Finish with a lime skim or a breathable clay paint.
On post-1950s cavity walls with cement-based backgrounds, a 3:1 sharp sand and ordinary Portland cement render with a salt-retardant admixture works well. Apply two 10–12 mm coats, keying between each layer, and top with multi-finish plaster.
Once dry, paint with a mineral or highly breathable emulsion. Never seal the wall with vinyl silk or bathroom paint—trapped moisture will push off your new plaster in months.
How to Know It Worked: Post-Treatment Monitoring
About 6 weeks after injection, take another moisture profile at the same points. A successful DPC will show readings dropping towards equilibrium with the room—typically below 14–16% WME on a budget meter under normal conditions, and a flat gradient from floor to waist height.
Example before and after readings from a solid brick wall:
Before treatment
Floor: 35%+
150 mm up: 30%
300 mm up: 25%
600 mm up: 18%
900 mm up: 12%
After treatment (6 weeks)
Floor: 17%
150 mm up: 13%
300 mm up: 11%
600 mm up: 10%
900 mm up: 10%
The steep gradient has gone. Moisture has stopped climbing. If readings remain stubbornly high, check that you haven’t bridged the DPC externally and that the wall has adequate drying ventilation.
FAQs
How long does a DIY chemical DPC last?
When correctly installed and not bridged, the silane/siloxane resin does not degrade. Practically, that means decades of protection. The main failure points are external bridging, cracked mortar allowing water entry above the line, or filling the cavity with debris that wicks moisture.
Can I just paint over the damp patches?
No. Any paint—even so-called “damp seal”—will fail. The water pressure from below lifts the film. You must install a barrier at the mortar level.
Why is there white powder on my wall?
These hygroscopic salts are left behind by evaporating groundwater. They continuously absorb moisture from the air and dissolve, then recrystallise as the wall dries, pushing off successive layers of plaster. Removing all salt-contaminated plaster and using a salt-inhibiting render is the only durable fix.
How much does DIY DPC injection cost in 2026?
Expect to spend £110–200 on materials for a typical room: DPC cream £50–120, render and additive £50–70, and incidental consumables £10–15. Professional costs start around £800 and often exceed £2,000 for a full wall strip and replaster.
Will this work on all wall types?
DPC injection works well on solid brick, block, and stone walls where you can drill a continuous mortar course. In rubble-filled cavity walls or walls with extensive voids, the cream may not spread uniformly, and professional foam injection or physical DPC insertion may be required. Very thick stone walls (over 345 mm) often need injection from both sides.
What if I have an old lime-built house?
Avoid hard cement renders; they trap moisture and can accelerate brick decay. Use a breathable NHL 3.5 lime render with a salt-inhibitor. Always let the wall dry naturally and repaint with a mineral or limewash finish.
When to Call a Professional
Pick up the phone if you see:
- Structural cracks wider than 5 mm or signs of wall movement.
- Soft or rotting timber joist ends in contact with the damp wall.
- Thick stone rubble walls, where finding a continuous mortar course is impossible.
- Listed building consent requirements that limit what you can alter.
- A damp problem that hasn’t responded to two separate treatment attempts.
A qualified surveyor (look for CSRT or CSSW accreditation in the UK) can perform a calcium carbide test and give you a definitive moisture profile before you commit to major work.
Your Wall Can Dry
Rising damp isn’t a mystery. It’s water climbing through pores, leaving salts behind, and destroying plaster. The fix hasn’t changed—you just need a continuous waterproof break in the mortar—but the execution in 2026 demands better diagnosis, safer practice, and a relentless focus on what’s happening outside the wall.
Drill the line. Inject the cream. Give the wall time to dry. Replaster with a salt-resistant, breathable finish. Then test the numbers.
The plaster will stop crumbling. The smell will lift. And you’ll have saved thousands by doing it yourself, with the confidence that the barrier under your feet is real.